DIY: IKEA hack

Been awhile since I’ve had the time for a DIY project, and this one has been on the radar since I purchased it. This RAST dresser from IKEA is about $40.00, and truthfully is a sight for sore eyes. I needed some extra storage at a low cost and knew this would be a great DIY project for later.

A simple paint job and some new pull knobs made this thing WAY nicer to look at, and it suits my bedroom style so perfectly. Check out the before and after below.

I used white chalk paint, electric sander (before and after for vintage look), and drawer pulls from a local boutique housewares store.

BEFORE

AFTER

Enter a caption

My Mexican Adventure

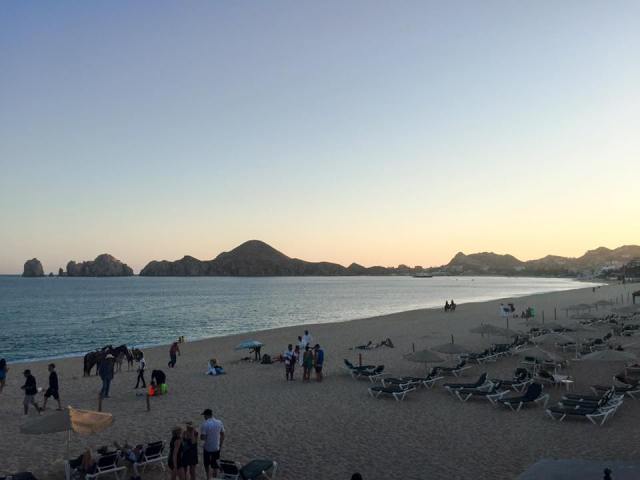
Travelling is something that has been born and bread into me since I was a child, and I can’t think of something that is more gratifying, and better for the soul. I recently travelled to Cabo San Lucas, Mexico, where the sun is so hot and beautiful you never want to leave.

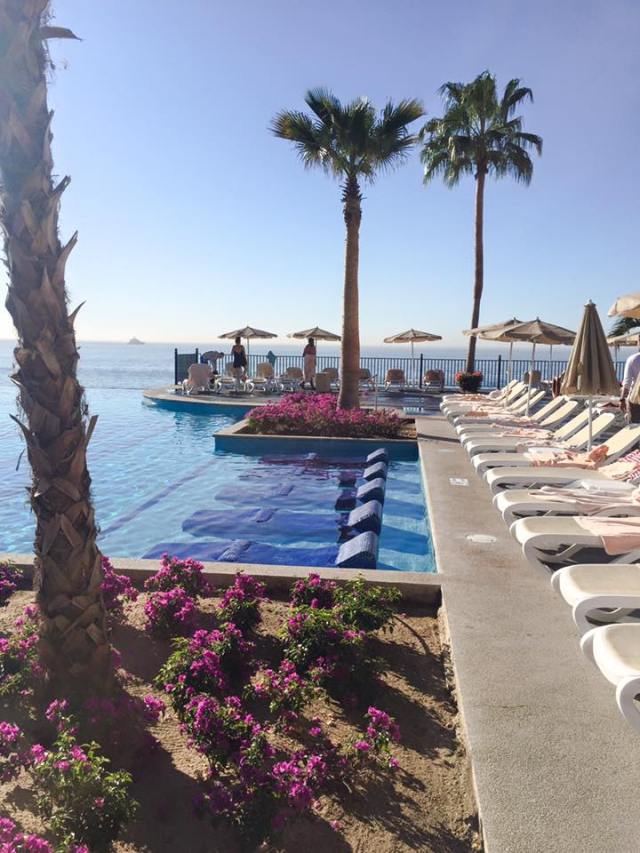
We stayed at the Riu Sante Fe, and although I’ve been to this resort before, I didn’t recall it being such a party place. Nonetheless, the hotel grounds, food and weather couldn’t of been more perfect.

I find there are two types of travellers out there. Those who go to an all-inclusive resort and sit on a beach to simply relax, and those who go to learn about the culture, the people and the history of a city. I’m under the impression these two types are not mutually exclusive and made every attempt to get to know about the locals and the Mexican culture.

Other than the no-clouds-in-the-sky-ever weather, the unlimited guacamole, and the crystal blue water, my favourite part of the trip was getting to know one of the staff members at the resort. His name was Roberto, and at first I thought he was kind of cold- always running around and not having much interest in chatting. I soon learned it wasn’t a lack of interest, but more a lack of time. He was such a welcoming soul after I asked him about his work and his life and he was so helpful and attentive from then on. He worked six days a week, 12 hours a day, and got seven days off a year. I wanted to go sling the drinks myself so he could have a break!

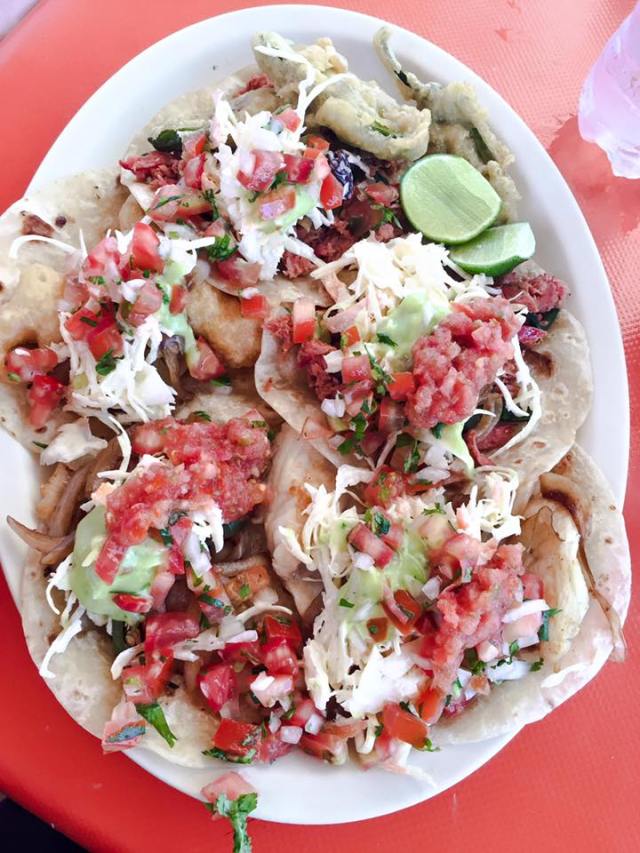
One of my favourite things to do when I travel is taste the local cuisine. The resort was great for serving guac and pico de gallo every day, all day. They also had taco stands outside at night. They had a Mexican restaurant as well, which was so delicious. So while I was content with all these options, I had a feeling it wasn’t authentic. Roberto assured me that the resort food had been “Americanized” and gave us a few places to go downtown Cabo where we could eat authentic Mexican tacos. He also explained that although these tacos were authentic to Cabo, every part of Mexico has a different spin on a traditional dish and they change from city to city.

On our very last day we taxi’d into the city to find this taco joint. At first, we were walking into unchartered territory, out of the tourist loop. This didn’t stop me and my undying love for tacos. After getting lost a few times, we finally came across this restaurant that Roberto had said was the best for seafood, Los Claros it was called. It was an orange building with open walls and no windows, and the menu was painted on the concrete wall. It was Sunday morning, so the restaurant was filled with locals which was slightly intimidating, but there were no issues and we were served promptly. MOST DELICIOUS MEAL EVER. I could of eaten the whole platter myself, but unfortunately I had to share with my boyfriend. We got the bill and it was only $10USD for 6 tacos, something like that would cost $30CAD at home.

So while this blog post could of been about the luxurious beach, the incredible view and the never ending parties, the part of this trip that I will remember forever is my Mexican friend Roberto, and the fish tacos that filled my tummy.

It’s always hard coming home after any vacation, but like you say to a friend who’s leaving, it’s “See you Soon”, not “Goodbye”.

I will be a frequent traveller to Mexico, and probably Cabo, as the people I met from other countries, and the Mexican people and culture are so beautiful and welcoming.

12809656_10153353174077478_2170786010575285176_n12801160_10153353174052478_8461202567377764767_n12813969_10153353174672478_4131694751754819490_n


DIY Wood Coasters


By now most of you know that wood is my go-to for all things DIY and interior design. I think it adds so much warmth and texture to a room, and historically wood has been signified wealth in a home. I have never bought a piece of furniture that isn’t from Ikea, so I tend to add these wood pieces so my home isn’t so stark.

I came up with the idea to make drink coasters when I built my coffee table. The table is made of pine (a relatively soft wood) and this means that even though it has been finished with a clear coat, it still stains. You can use almost any type of wood, it really depends what look you like best. I used Walnut, which is an “exotic” wood and runs a bit more than pine or cedar, but looks amazing.

These coasters were really simple to make, and if you’re not handy with a saw, you can get the lumber store to cut it for you at an extra cost.

For the coasters, I used:

1″ x 4″ walnut – cut into 3 3/4″ pieces (1″ x 4″ lumber isn’t normally 4″ wide. They called it finished lumber which means the piece started at 4″, but was cut down to make it smooth. You just want to make sure you have perfectly square pieces).

Stain- You will need to do at least 2 coats, but if you’re only making 4 coasters a small can will do.

Sandpaper/electric sander- If you have the opportunity to use an electric sander this will speed up the process immensely.

Once you have the pieces cut into squares, it’s time to start sanding. Be careful to sand the pieces on level ground so you don’t round the edges or give them a uneven surface.

Next is staining. Using a brush or foam brush, cover the pieces completely making sure to be going with the grain.

Let them dry (1-2 days)… and sand again.

The reason you’re sanding them so much is to get the best grain out of them as well as making them as smooth as possible.

Repeat this at least 2 times.

Although this seems like a small project at first, it is time consuming. They are a great thing to give as a gift and something similar would often cost twice as much in the store.

Happy Building!

Toni


Natural healing: Essential Oils and Pink Salt

Hey friends,

Since it is a new year, and many of us plan for new year’s resolutions, I thought I would share one of the things I want to change this year.

I have suffered from headaches since I was a teenager, and this means that there have been days when I take more then the recommended dose of Advil. Some days headaches turn into migraines, and the Advil/Tylenol cocktail is amped up. In hopes of figuring out what my “triggers” were, I cut out gluten, and other food allergens, I drink A LOT of water every day (and barely anything else) and I still haven’t quite nailed it down.

So, my new year’s resolution is to stop fixing one problem, with another problem. Taking drugs to fix my headaches is a short term solution, and it could be really harmful to my liver on bad days. Sometimes I would take Advil to get rid of my headaches at night, which was also a method of getting to sleep. It was getting crazy.

Meet my new Himalayan Pink Salt Lamp. I have wanted one for a long time, and although the benefits of this lamp are not directly associated with fixing my headaches, it does help with relaxation, stress relief and insomnia (it is also pretty and a great decoration for my room).

Without getting scientific ( I couldn’t if I tried), the lamp gives off negative ions, that balance the positive ions in your home. This means that it purifies the air, and gives you the same feeling that you would get if you were standing beside an ocean or a waterfall.

So far I am loving it. It helps set the mood with a dim light, like a candle, but without the toxins. I am also incredibly scared of the dark, so it’s a great excuse to keep the light on!


Next on the list is my new Saje nebulizer. My house is normally really dry, and a humidifier is really essential to keep the air comfortable. This little machine (also pretty) distributes vapour into the air that can either be just water, or a mixture of water and essential oils. It acts as a humidifier as well as an air purifier.

It can run for 2 or 4 hours at a time, and I put oils that are good for relaxation, headaches and really anything that I love the smell of. Peppermint oil is one of the best healers for headaches, so I put 10 drops into this every night to ensure a great sleep!

Although these remedies don’t “cure” headaches immediately, it is a learning process and something that I want to continue to develop. Advil will be saved for desperate times and hopefully eventually never needed. Figuring out why your body is unhappy is the true key to having a long term solution.

Drip-Painted Mason Jars

I recently discovered a big box of empty mason jars in my grandmas basement and have been on the lookout for cool things to do with them (the key being to not inundate my entire house with mason jars).

I have been tiding up my work space at home to prepare for my inundation of school studies and decided a few mason jars could substitute for an ugly dollar store pen/pencil holder.

Here’s what happened:

I found a large jar and a small jar from my collection. They’re pretty old which gives them a vintage look.

I also wiped them down. Painting over any kind of dirt or grease is never a good idea.

I had some Orbit Recycled paint laying around from another project in the colour “Snow” so I just used that.  A gallon of paint best here, or at least putting your paint in a large enough bowl or bucket so the jar can be completely submerged.

Dunk the jar about 3/4 of the way in and let it drip over the can to get excess paint off. 

Now comes the tricky part. Flip the jar over without touching the painted section and place the opening down on a paper plate or towel, or any sure face that can get dirty.

let it drip and run down the jar. I let mine sit overnight since I used ordinary wall paint and it takes a bit longer to dry.

Flip over, and Ta-da! I filled them with marbles and then stuck pens and pencils in them. They could also work for makeup brushes, or paint brushes for all the artists out there.

IMG_6736

Copper & Wood Clothes Rack

Fall is here and it’s time pull out your warm clothes. However, don’t get ahead of yourself, winter is no where near so keep those clothes far, far away.

During this time of year, I tend to shop (too much) for back to school, and I stock up on some new clothes for the season (because I need clothes, obviously I don’t want them). The problem with this is, that I don’t get rid of anything, which results in having less and less space. I’m pretty sure I’m the only woman on this planet with this problem (kidding).

My drawers are overflowing, and my boyfriend’s side of the closet gets smaller and smaller every weekend. My solution to this problem: a simple, easy, DIY clothes rack that I can build in 5 minutes! Just kidding, this is absolutely not the case with this project.

I’ve seen them at IKEA and in decorating magazines, and thought it would be a good use of space to showcase some of my favourite pieces. Once again, I decided to make the project instead of driving to IKEA (because I’m awesome and motivated) and I’m glad I did.

Here is what you need:

1 x 3″ Pine- 4 pieces at 6′

1 x 2″ Pine – 2 pieces at 18″

1 x 3″ Pine- 2 pieces at 2.5′

1 x 4″ Pine- 4 pieces at 4′

Copper Pipe- however wide you want the rack to be, (some people might not have as much space) mine was 5′ long, and the rack was 4′ long as I wanted it to overhang

2- Copper Pipe Fittings or U-brackets

2.5-3″ bolts, with nuts & washers

2.5″ screws- about 30

Drill with 7/8″ spade bit

IMG_6863 (1)IMG_6861

  1. First step, forget about getting this done perfectly the first time. If you do get it done perfectly the first time, then you should go write your own blog and make money from this.
  2. Stand the 2 pieces of 1 x 3″ up in a criss-cross pattern and mark where you will drill for the copper pipe.
  3. Measure from the top of the piece down to the mark you made and mark the other two pieces accordingly.
  4. Drill through all 4 pieces of 1 x 3″ with the spade bit so that the pipe can easily fit through on each side.
  5. Drill another small hole right below the large hole, so that the bolt can hold each pair of pieces together, so it looks like this:IMG_6862 (1)
  6. Take the 18″ pieces of pine and screw them at the bottom of each criss-cross.
  7. Screw each piece of 1 x 4″ ON TOP of the 1 x 2″ pieces you just screwed on. This is creating the shelf on the bottom.
  8. Connect the copper pipe. Thread the pipe through each side of the criss cross and use the fittings or brackets to keep the pipe in place (as seen in the photo as well)
  9. Finally, take the 2.5′ pieces and screw them on the back of the rack so that they meet in the centre of the bottom shelf and connect to opposite sides.
  10. If this didn’t work, don’t get mad at me. Go to IKEA and buy one for $30. I’m sorry!

Now you’re probably wondering why I’m being so pessimistic while I try to convince you to build this yourself. I thought I would be honest with you as it didn’t turn out perfectly the first time, and I had to fiddle with it before it all fit together. With that said, you CAN do it and when you do it will be awesome!

Happy Shopping!

Rope Wall Shelf

Hey everyone! Hope you’re settling nicely into the fall season and drinking all the PSL’s you can get your hands on.

I thought this project would be good for this time of year since everyone is so busy, and the weather may not cooperate, but you can have this up in ready in no time at all. One thing about me is that when I decide I want to make something, whether it’s dinner, cookies or a piece of furniture, I want to start making it immediately. This usually results in late night runs to the store since I never seem to have the materials I need on hand. This was one of those occasions. I ran around Home Depot trying to find rope (I HATE asking people for help, I think I know my way around the world, but the reality is I don’t).

Anyway, here is this rope shelf I made one night when I decided I hated the photos that were hanging in my living room (it actually took two separate nights since the paint had to dry, which was agonizing).

IMG_6785

IMG_6797

IMG_6791

Things:

Sisal twine

Wall hooks

1″ x 5″ x 30″ poplar wood

Drill with 1/2″ spade bit

I made two of these shelves, the one pictured here is hanging above my couch in the living room and the other above the toilet in the bathroom.

They were really easy to make.

  1. Drill 4 holes with the spade bit and drill equal distance away from each other on each side of the board. It will probably need to be roughly sanded after that to get rid of the wood bits.
  2. Paint. Looking back I could of probably used melamine shelving or MDF so it would of already been white, but I like textures, and I also like doing everything the hard way, so I painted the poplar wood with white paint. It needed two coats so I let it dry over night before I applied the second coat.
  3. The fun part! Cut the twine in 4 equal lengths, however long you want(keep in mind some of the length will be taken up by knots).
  4. Knot the twine, make sure it’s tight and string it through each hole. Sisal twine is strong and holds well so it shouldn’t take more than a single knot and some strength!
  5. Tie the two ends of the twine together at each end of the board  so they are as equal as possible (you want the shelf to be level).
  6. Now to hang them. Just mark where you will insert the wall hooks so they are at the same height at each point in the wall. If you’re lucky enough to have hit studs behind the drywall you can screw them right in. Otherwise, you may need wall plugs to make sure the shelf doesn’t make an enormous hole in your wall.

And that’s it! I’ve been really finding that coming up with my own, affordable ideas are way more rewarding (and awesome) then spending money on IKEA furniture and decor that everyone else has. So try it out! You can do it!

🙂

Back to School? Get Organized

With everyone heading back to school this week (including myself) I wanted to share how I got my desk space prepared and organized. I’m entering into the Public Relations Post Graduate Certificate program at Mohawk College, and word has it that it is going to be amazing, but also challenging. Because of that, I wanted to make sure every inch of my life was organized before I got into the major course load.

Here’s what I came up with

IMG_6888

Since I live in a rental, I never like to put too many holes in the wall, but I wanted to have everything that I would need grouped together for easy access. I improvised and created my own wall that I could put holes in. Another bonus is that this way is temporary, and if you’re like me, you change your mind every other day. My desk doubles as a place to do my makeup and get ready in the morning so saving space was crucial.

Things I used:

– 2 x 3 ‘ piece of plywood (I used 1/4″ mahogany underlay)

– White paint

– 2 pieces of cork board (got these at Dollarama for $3)

– Basa wood box for the pen holder (Micheals, or any Dollar store should have something, or you can improvise!)

– The hooks are clothes pins that I painted. I couldn’t find any that I liked so I fixed them up.

-A desk calendar, and some inspirational artwork (that I clearly made), and the wood letter. Other things I thought about were drawer pulls that could be used as hooks, a dry-erase board or a magnetic board to keep important pictures or documents close by.

IMG_6907
IMG_6872

I like how cozy this makes my desk area, and how organized everything looks. It is a different take on traditional cork boards or dry erase boards; it kind of gives you the option to have anything and everything you want.

This is especially ideal for people who are dealing with small spaces, rental spaces or even if you don’t want to have permanent holes in your wall. So go make the most out of the corner in your bedroom or kitchen and give yourself the luxury of an office space by giving a spare wall a facelift.

Ps. If you’re not going back to school, this could be made for a front hall way or near an entry door. You know, for that person who can never find their keys, phone and wallet.

Flea Market Find: Bookshelf Ladder

Normally when I build something I have been thinking about it for sometime, I’ve googled the best possible way, I know things I’ll need, where it will go and so on. This was not the case for this project.

A couple weeks ago I was looking at Facebook and saw the Junction Flea was going to be at Hamilton’s City Hall the following day. My boyfriend Paul and I had been to the Junction Flea in Toronto a few weeks prior and had a blast so naturally I dragged him to the Hamilton one.

Not looking for anything in particular, we wandered around. Initially I bought some gold elephants (I have been wanting some elephants for a while, as my grandma has always told me that they are good luck and that every home needs at least one) and then I saw this old wooden ladder. I explained to Paul that we could turn it into a bookshelf, which was on our to do list, so we bought it for $30 and he walked it home (this was a sight to see, as we don’t live just around the corner). I really had no idea if this was going to A. work or B. fit.

IMG_6776

IMG_6780

The elephants that I got from the flea

How we made it:

  1. For the shelves that would lie across from each side of the ladder, we used 1″ x 12″ rough barn pine. Normally I might not of opted for something rough, but it was the cheapest and we were on a budget.
  2. We measured how long each shelf would be, making each shelf 6″ shorter than the previous, so we would end up with a pyramid shape.
  3. We got the lumber yard to cut the pieces for us, so really the only work involved was sanding. I have an electric Dewalt palm sander that I was really thankful for. If you like the rough, rustic look, sanding might be optional.
  4. We set the shelves across from each side of the ladder and put it in place.

We ended up rearranging our entire living room 5 times, Paul wanted to kill me. We even had to get rid of some furniture, all for this potential bookshelf. It worked out nonetheless and looks great.

This is probably the easiest, yet biggest project I’ve taken on and it took the smallest amount of time and money. If you have the space, this shelf isn’t just a place to store things, but it is a conversation piece.

Ladder $30

Wood $16

Total $46

A Day in Toronto

One of my good friends, Amber just moved to Toronto to start her second Master’s degrees (I know, shes the smartest) at York University. I spent a beautiful, hot Sunday with her exploring her new neighbourhood and Kensington Market. I took a few photos of the cool things we did and thought I would share.

First stop was lunch. One of the things I was looking forward to was a healthy lunch as there are so many options to eat vegan or vegetarian in the city. Luckily, Amber has a nice vegetarian place right near her called Fresh (on Bloor). I had this beet/carrot/ginger frappe juice (it was not only pretty to look at but delicious as well).
The “Tangled Thai” salad was the star of the show though. Carrots, yellow beets, cabbage and peanut lime dressing – it was to die for. You can kind of see Amber’s dish in the background which was a traditional breakfast gone vegan. Tofu scramble and tempeh bacon… Seriously good.

Next we ventured down to the Kensington Market for pedestrian Sundays. The streets were blocked off and full of people performing (below a girl is doing a burlesque dance), tons of vintage shops and so many cute restaurants.

Then we had vegan soft serve. *disclaimer- I am not vegan, but sometimes like to think I am. I’m still battling an addiction to mayo and cheese, so maybe one day.
  “Car-den”

I am so happy for Amber to start her next chapter, especially in such a beautiful city! Also I am excited for myself since I have someone to visit in Toronto so I can learn new things like how to depart a street car.